Overview
This article provides a comprehensive guide on how to contact participant groups in a survey project. It covers various actions for sending emails, testing mail dispatch, and sending invitation emails.
Information
The e-mail dispatch options, which are opened via the Contact Participant groups button, allow you to target emails to specific participant groups without performing a search in participant administration. This guide explains the available dispatch options and how to use them effectively.
Actions
You can trigger the following actions by clicking on the respective link:
-
Send a test e-mail to yourself: This enables you to send a test e-mail to a user-defined email address and optionally create a corresponding tester account at the same time.
-
Send invitation emails: Will automatically select all persons existing in participant administration, irrespective of their disposition code (except participants with disposition code 15). Clicking here will open the mail dispatch window, and you can either write an e-mail or select a mail template.
-
Send invitation emails (only those who haven’t gotten an invitation so far): Will automatically select all persons who have not been invited yet (disposition code = 11). “Invitation mail” type templates are available in the mail dispatch window.
-
Send reminders: This will automatically select all persons who have not yet started the survey or who have not yet completed it. You can choose which participants are reminded: only those with disposition codes 11, and 12 or all participants with disposition codes 11, 12, 20, 21, 22, 23. In the mail dispatch window, you can then select the template for the reminder mail.
-
Inform successful participants: Will automatically select all participants who have finished the survey (disposition code 31, 32). Therefore, this function is particularly well suited for thank-you emails. “Invitation mail” type templates are available in the mail dispatch window.
-
E-mail to first page viewers: Will automatically select all persons who have viewed the first page of the survey but have not clicked on the Submit button (disposition code 20). These participants can then be sent a specific reminder mail.
Testing Mail Dispatch
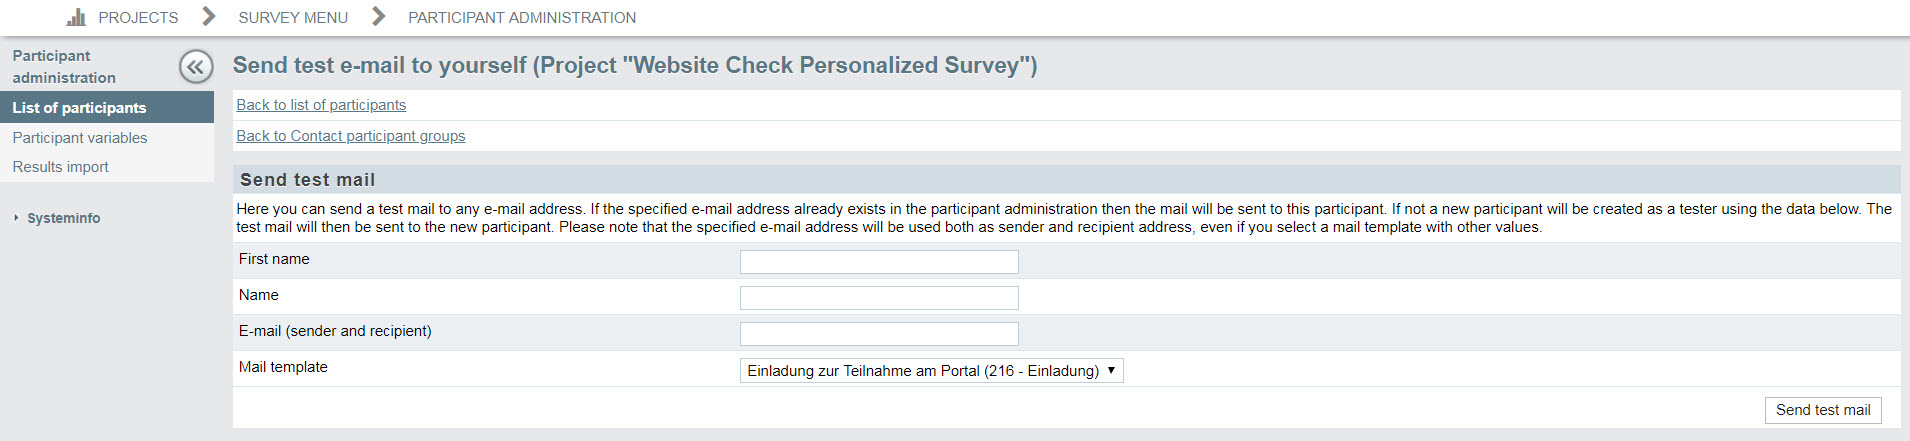
With the Send test e-mail to yourself option you can send a test e-mail to a user-defined e-mail address and optionally create a corresponding tester account at the same time.
-
You can enter your own or any other e-mail address.
-
If the specified e-mail address already exists in the participant administration of the project, the e-mail will be sent to the respective participant.
-
If there is no participant with the specified e-mail address, a new tester account will be created based on your input and the e-mail will be sent to this account.
-
Please note that the specified e-mail address will be used both as recipient and sender recipient addresses, even if you select a mail template with other values.
-
-
You can select the mail template (type: invitation mail). If you want the recipient of the test e-mail to log in and test the survey, the template should contain wildcards for the login data, i.e. survey link, code, and/or password. When sending the mail, these wildcards will be replaced with the corresponding data of the tester.
-
If you are not using an already existing tester, you can, in addition to the e-mail address and mail template, also specify the first name and name of the new tester account to be created. If the mail template contains the wildcards #u_firstname# and #u_name#, these will be replaced with the respective details. Other wildcards will be replaced only if an appropriately prepared set of participant data is available.
-
To try out the test function, click on the Contact Participant Groups button in the participant administration.
-
Select the action Send a test e-mail to yourself.
-
This will prompt a dialog where you can enter various basic data required for sending e-mail. Enter the tester data and select the mail template.
-
Click on Send test mail to initiate the test.
If you want to test the complete mail process, i.e. receive the mail, you should only use either your e-mail addresses or the addresses of users who have given their consent.
Send Invitation Mails
You will go through the entire mail dispatch process, from selecting the recipients and filling in the form to checking that the mail has been sent success- fully.
-
Switch to the Contact Participant Groups tab in Participant Administration. It offers various options for contacting participants with a specific status.
-
Click on the Send invitation mails link.
-
Select the desired mail template, and confirm by clicking on Apply mail template.
Please take into consideration that only those mail templates that fit the respective action area will be offered for selection. For example, if you are in the area of the “Send invitation emails” function, only the templates of the “Invitation” type and of the “Default” type, which can be used anywhere, will be offered.
-
Make sure that the proper mail format has been selected. Otherwise, change the mail format and confirm by clicking on Apply mail format.
It is important to select the proper mail format before entering content: different input boxes are used for the various formats.
-
If you wish to make use of the advanced mail settings, open this section and make the desired changes.
-
Check the content and settings of the mail template.
-
Tick the “Personalized dispatch” checkbox if you wish to use the recipient’s real name.
-
Enter the subject.
-
Select the sender. If the desired sender is not available, you can click on the Add mail sender link to open the menu for creating new senders (Chapter 12.4, p. 536) in a new window.
-
Formulate the content of the invitation mail. You can display an overview of the wildcards you can use by clicking on the question mark icon.
-
If you wish to add an attachment, it should be uploaded in the “Add an attachment” field. Locate the desired file, and click on Attach file to add it.
-
Click on the Preview mail button to check the result.
-
In particular, check whether the wildcards are replaced correctly.
-
If you want to save the mail for future use, tick the “Save as mail template (including wildcards)” checkbox and enter a title for the new template.
-
If you are satisfied, click on Send.
-
The Mail Transmission Report menu gives you an overview of the emails that have been sent.
Please note: The e-mails will not be sent immediately but, depending on the mail volume, will be placed in a queue and processed in groups in ten-minute intervals.
FAQ
What types of mail templates are available for different actions?
Mail templates are specific to each action. For example, "Invitation" type templates are available for sending invitation emails, while "Default" type templates can be used for any action.
How can I add a new mail sender?
Click on the Add mail sender link in the sender selection menu to open a new window for creating new senders.
When are the emails sent after clicking "Send"?
Emails are not sent immediately but are placed in a queue and processed in groups at ten-minute intervals, depending on the mail volume.
Priyanka Bhotika
Comments