Overview
This article provides a comprehensive guide to Panelists Administration in EFS Panel. It covers various aspects of managing panelists, including searching, adding, importing, and editing panelist data, as well as performing duplicates checks and handling candidates.
Information
Panelists Administration is a crucial aspect of managing online panels. This guide focuses on the tools and processes available in EFS Panel for efficient panelist management, data integrity, and quality assurance.
- Panelists Administration
- Adding Panelists
- Importing Panelists
- Updating Panelist Data
- Candidates
- Duplicates Check
Panelists Administration
The Panelists Administration menu allows you to view and edit the data of all panelists, including candidates. It provides powerful search functions and tools for managing panelist information.
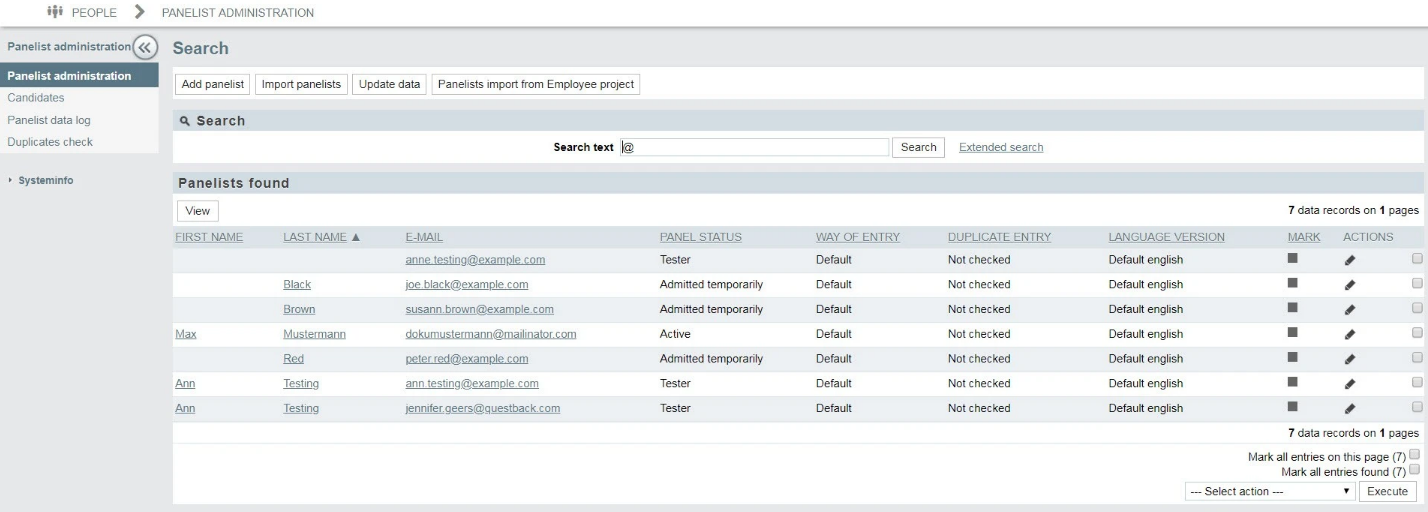
@ in the search field and trigger the search.
Simple Search
Executing a Search Query:
- Go to People → Panelists administration.
- In the “Search text” field, enter a term or part of a term (e.g., panelist's name).
- Click on Search.
- If the term is found in a panelist’s data record, the panelist will be displayed (deleted panelists are ignored).
- Click on the panelist's name to open the detail view.
How the Search Function Works:
- Ignores upper and lower case.
- Excludes the following fields: "WWW" (u_www), "street" (u_street), "place" (u_city), "PLZ" (u_zip), and "phone number" (u_phone).
- Returns all entries containing the entered term.
Note:
- Large results may not display all panelists on the first page. Use the > (Next page) and < (Previous page) links to scroll through the results.
Extended Search
The Extended search function, which you can open by clicking on the link of the same name, offers you diverse options for narrowing the search in your panelist data. The search criteria listed in the following table can be either used individually or combined.
|
Field
|
Explanation
|
|---|---|
| Search in all fields | See above. |
| Language version |
Indicates which panel site and language version a panelist you are searching for used to register or which panel site and language version was preset as an attribute during import. |
| Name | The panelist’s last name. |
| First name | The panelist’s first name. |
| The e-mail address. | |
| Homepage | The panelist’s homepage. |
| Street | The street. |
| City | The city. |
| Zip code (from) / (to) | The zip code range. |
| Phone | Phone number. |
| Member status |
Allows you to access panelists with a specific panel status. |
| Status |
The search can be restricted by panel status, to as an additional status in customized panels to describe the reliability of panelists. Cannot be used in the standard panel. |
| Group category | The search can be restricted to one category. |
| Group members |
Allows you to access panelists who belong to groups that have already been created. Clicking on the Binoculars icon opens a popup window, in which you can select the group. In addition you can choose from between two search methods:
|
| Pseudonym | Anonymized panelist ID, e.g. found in exported data records. |
| Member entered panel via |
Indicates how the panelist you are searching for entered the panel, e.g. by data import or admin entry. |
| Ways of entry | Attribute assigned during registration. |
|
Number of master data survey invitations from / to |
Allows you to search for panelists that have received a specific number of invitations to the master data survey. |
| Date of entry from / to |
Allows you to search for panelists who have registered within a specific period. |
|
Date of last master data invitation was before |
Allows you to search for panelists who have last been invited to the master data survey quite some time ago. |
| Duplicates status | The status output from the duplicates check. |
| PCI value | Describes the reliability of panelists. |
| Show additional master data variables |
Expands the table with columns that contain the selected master data. |
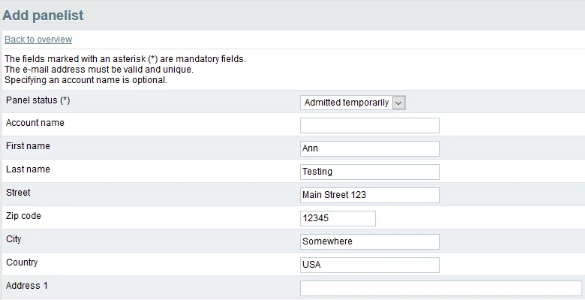
Adding Panelists
Making a manual entry is advisable if you wish to enter a single person into the panel, e.g. to create a test account.
- Open the People → Panelists administration menu and click the Add panelist button.
- Fill in the form. The details marked with an * must be entered.
- If you wish to create a tester account, select the “Tester” status.
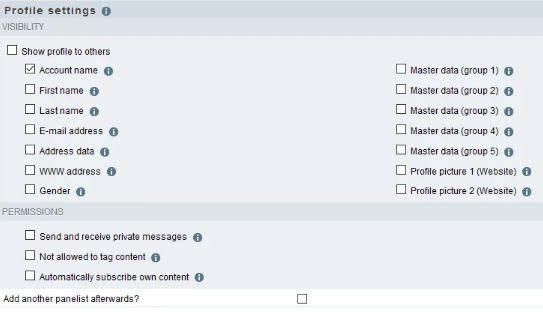
- When using panelist profiles, you can define the visibility of the profile data for the new panelist in the “Profile Visibility” section. In the example shown below, the profile will not be made visible to others immediately after the creation, the reception of private mails is deactivated initially.
- Confirm by clicking on Create account.
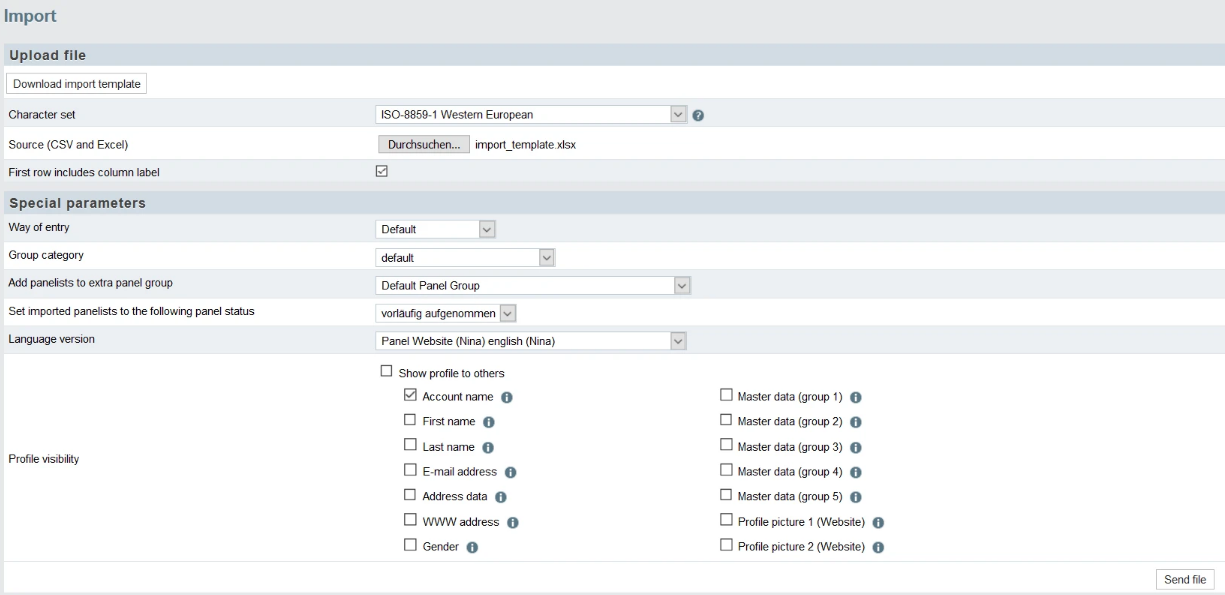
Importing Panelists
You can import lists of future panel members, including participant data, master data, and selected system data, to generate new panelist accounts.
Steps to Import Panelists:
-
Open Import Dialog:
- Go to People → Panelists administration.
- Click on the Import panelists button.
-
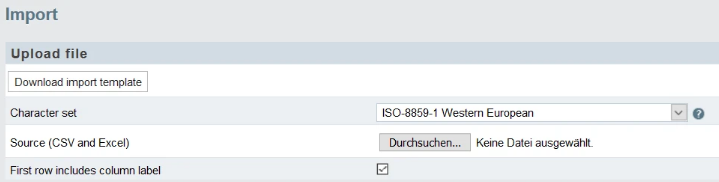
Download and Prepare Template:
- Click on Download import template.
- Open the template in Excel or a similar program and enter the data.
- Save the file in Excel or CSV format.
-
Prepare for Import:
- Way of Entry: Create a common way of entry for imported panelists for easy identification and organization (Chapter "Recruiting Panelists").
- Group Creation: If grouping immediately, create the group (Chapter "Creating and Editing Groups").
-
Import Process:
- Return to the import dialog.
- Select the appropriate character set.
- In the “Source (CSV and Excel)” field, select the file.
- Ensure the “First row includes column labels” checkbox is activated.
- Optionally, select a way of entry and specify the category and group.
- Select the panel status and language version for the imported panelists.
- In the “Profile visibility” section, define the visibility of profile data.
-
Start Import:
- Click on the Send file button to start the import.
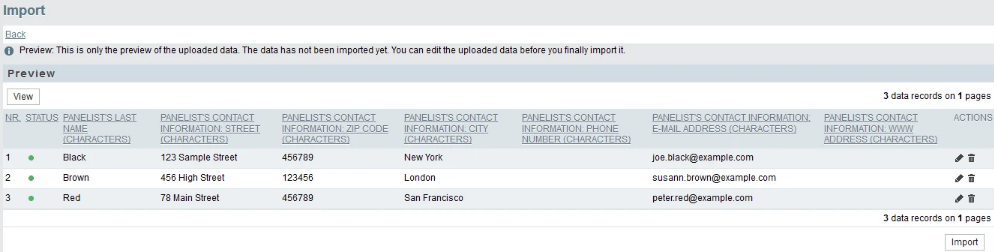
- Match columns of the import file with appropriate database fields on the Participant data and Master data tabs. If using the template without changing labels, the software will automatically allocate the fields.
- Confirm allocations by clicking on Save allocation on both tabs.
- Click on Proceed to preview.
-
Preview and Correct Data:
- Review the import preview. Traffic-light icons indicate data record status. Hover over red icons for error details.
- Use Edit and Delete icons to correct or remove specific data records.
- Return to the overview using the Back link.
- Review the import preview. Traffic-light icons indicate data record status. Hover over red icons for error details.
-
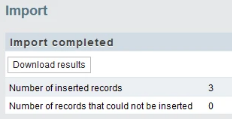
Execute Import:
- Click on the Import button to start the import.
- The import may take time; do not close the browser. Use another browser window if needed. For large imports (>5,000 records), use smaller import files.
-
Review Results:
- After completion, the import summary will show the number of successful and failed records.
- Click on Download results to get an Excel file with:
- All data from the import file.
- Import results (e.g., “Data record import successful” or “Data record not imported”).
- Error reasons in the “messages” column.
- After completion, the import summary will show the number of successful and failed records.
-
Correct and Re-import:
- Correct unsuccessful records in the Excel file, remove successfully created records, and use the file for a new import attempt if necessary.

Data to be Imported in Detail
Before importing panelists, specify which data to import and how to save it. The following data is required or optional for a panelist import:
-
Participant Data:
- Required: Email address.
- Optional: Passwords, bonus points, and a reason for bonus points allocation.
-
Master Data:
- Optional: Import all or selected master data. Ensure master data variables are created in advance (see Chapter "Master Data").
-
System Data:
- Automatically set during import (see table below).
Importing Passwords:
- Initial passwords for imported panelists are usually generated automatically, with a reset link sent out.
- To import existing passwords, enter them in the “u_passwd” column of the import file.
- Passwords must meet security criteria defined for the respective language version.
- Use the wildcard #password_recovery_url# to send reset links to imported panelists in the invitation.
Importing Bonus Points and Reasons:
- To credit bonus points during import, enter the desired number in the “credit_points” column.
- For a reason displayed in the account statement and bonus points log, enter text in the “descr” column. If no text is added, the default “Balance on YYYY-MM-DD HH:MM
” will be used.
Importing Master Data:
- Optionally include selected or all master data. Master data variables must be pre-created.
- To update existing accounts, use the Update panelist data function. This updates records without creating new accounts.
System Data Automatically Set During Import:
- System variables are automatically assigned values during import.
Ensure all necessary fields are filled in correctly before proceeding with the import.
|
Variable name
|
Automatic setting
|
Meaning
|
|---|---|---|
| pstatus | 1 (Admitted temporarily) | The panel status. |
| pinput | 2 (Data import) | The mode of entry. |
| pcredit_points |
Contains the value of the “credit” import variable if values for that variable have been imported. Additionally, an entry in the detailed account management table is created. |
The total sum of bonus points. |
| pstatus_date |
The current system date during the import operation. |
The date of the import. |
| penter_date |
The current system date during the import operation. |
The date of entry into the panel. |
| pseudonym | Created individually. | The pseudonym. |
| md_status | 12 |
The status in the master data survey. |
| reg_code |
The value will be set if a way of entry has been selected in the import dialog. |
The way of entry. |
Adding Panelists
Clicking on a panelist’s name in the list opens the detail view of that panelist’s data, which is distributed across several tabs:
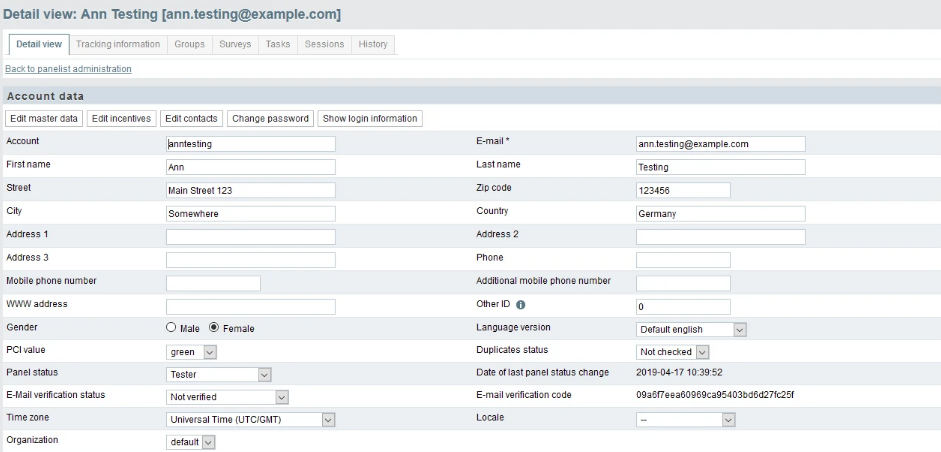
- Detail view: Contains account data, visibility settings, bonus points, and contact history.
- Tracking information: Displays the panelist’s tracking data.
- Groups, Surveys, and Tasks: Information on group memberships and assigned tasks, with options for manual changes.
- Sessions: Shows information on the most recent sessions.
- History: Displays the history of changes made to address and master data by the panelists.
Overview
The Detail view tab provides an overview of key panelist data, including account data, profile visibility settings, bonus points, and contact history. Various buttons open dialogs for further information and editing options.
Account Data
- Lists participant data, excluding the password (viewable and changeable in special dialogs with appropriate authorization).
- Displays language version, PCI value, duplicates status, panel status, e-mail verification status, and e-mail verification code.
- All data except for the last change of panel status and e-mail verification code can be edited.
Profile Settings
In the Profile settings section, you can change the following for the selected panelist:
- Visibility of profile data.
- Permission to send and receive private messages.
- Permission to tag posts.
Status information
|
Field
|
Meaning
|
|---|---|
| Pseudonym | Encoded unique panelist ID. |
| Panelist code | Code the panelist can use to log directly into the panel. |
| Way of entry | Indicates way of entry via which panelist reached the panel. |
| Canvasser |
If the panelist reached the panel on the basis of recommendation the name of the canvassing panelist is listed in this field. |
|
Number of recruited panelists |
The number of friends this panelist has recruited in tell-a-friend campaigns, divided into:
|
| Mode of entry |
Characterizes the nature of entry, for example by data import or manual entry. |
| Admitted to panel on | Panel entry date saved in “penter_date” system data. |
| Last modification by |
Records who last changed the account data. The information is saved in the “last_mod_user” system data item. |
| Last modification | The date of last modification of account data. |
In this area, information regarding the panelist’s activity on the panel site is listed. Further details can be found under the Sessions tab.
|
Field
|
Meaning
|
|---|---|
| IP address on registration |
From the panelist’s IP address conclusions can be drawn regarding identity, place of residence, country or Internet connection. This can be helpful, for example, if there is any suspicion of dual accounts being maintained or other forms of abuse. Please note: The determination of hostnames and IP addresses is possible only to a certain extent, due to legal and technical reasons. |
| Host name on registration |
From the host name conclusions can be drawn regarding the panelist's identity, place of residence, country or Internet connection. Please note: The determination of hostnames and IP addresses is possible only to a certain extent, see above. |
| Number of panel sessions |
Total of all previous panel sessions conducted by the panelist. Calculated from the number of successful logins. |
| Number of page views |
Total of all page views triggered by the panelist during panel sessions to date. |
| Date of last login | Indicates when the panelist last logged in to the panel successfully. |
Updating Panelist Data
Panelist and master data of existing panelists can be updated using a dedicated update function.
Prerequisites:
- Panelists must already exist.
- Required master data must be created.
- New panelists are created using Panelist import.
- New master data can be created using a dedicated mass import feature.
Update Capabilities:
- Update participant data, master data, and important system variables (“mail_validation_status,” “credit_points,” “descr,” “pstatus,” “site_id,” and “pci”).
- The import file should contain only the data to be updated.
- Various linking variables can be used for matching with the panelist datasets.
Executing an Update:
- Go to Panelists administration → Update data.
- Download the import template and enter your data. Ensure the linking variable is included (e.g., “pseudonym” or “panelist_code”).
- Upload the file.
- Choose the linking variable and match the import file columns with the database fields.
- Check the allocation in the preview and start the update.
Information:
- The update process may take time depending on the data volume. Do not close the browser. Open a second browser window if needed to continue work during the import.
- For large imports (>5,000 records), use smaller import files.
Linking Variables:
- “pseudonym”: Commonly used.
- “u_account,” “u_email,” and “panelist_code”: Used in many panels for unambiguous identification.
- “u_other_id”: Useful for special panels referencing an external data source. This variable links panelists to additional information in an external database.
Ensure that the import file and linking variables are correctly set up to facilitate a smooth update process.
Panelists Import from Employee Project
You can import users or participants from Employee projects into the panel, assigning them to their respective panelist accounts based on matching email addresses. This feature requires the user to have the panelimport access right.
Steps to Import Users or Participants:
-
Open the Module:
- Navigate to People.
- Click on Panelist administration in the sidebar menu.
-
Initiate Import:
- Click on Panelists import from Employee project (visible only to users with the
panelimportread right).
- Click on Panelists import from Employee project (visible only to users with the
-
Select Import Type:
- For users: Activate the option User.
- For participants: Activate the option Participants.
-
Choose Project and Group:
- In the Choose project drop-down list, select the Employee project to import from.
- Select a Group category (default includes all panel groups).
- Select the panel group to which participants or users will be added.
-
For Users:
- Confirm with Save.
- Review the preview to ensure data completeness and make adjustments if necessary.
- Click Import to execute the import.
Note: Existing Org Processor users who are panelists will not be automatically imported. They must be added to the group manually, along with their roles and units.
-
For Participants:
- Select Structure view, metaname, and label of the Masterdata column for your department and parent department from the drop-down lists.
- Confirm with Save to execute the import.
Post-Import Actions:
- To see the newly added panelists, go to People → Groups → [open group].
- To set panel status to active:
- Check the relevant group members.
- Select Active from the Select action drop-down list.
- Confirm with Execute.
Searching for Panelists:
- Enter
@in the search field of the Panelist administration and press enter to list all panelists.
Viewing and Changing a Panelist’s Master Data
-
Access Master Data:
- Click on the Edit master data button to view and edit the panelist's master data.
-
Master Data Tab:
- Lists labeled master data for the panelist (e.g., “Employed” instead of code “14”).
- Option to restrict view to specific master data categories.
-
Modify Master Data:
- Click Modify master data to change one or more master data manually.
- Enter the code for encoded master data (found in the master data codebook under People → Master data → Master data codebook).
-
Category Overview:
- Click Category overview to see a table with:
- Number of variables in each category.
- Number of standard variables (not “Recording” or “Lookup” type).
- Number of variables the panelist has edited (excluding recodings and lookups).
- Traffic-light icons indicating progress.
- Click Category overview to see a table with:
Viewing the Incentives History
-
Access Incentives History:
- Click on the Edit incentives button to view and manage the panelist’s bonus points, prize draws, and tell-a-friend campaigns.
-
Bonus Points Tab:
- View the panelist’s account balance.
- Click Change bonus points to manually adjust the number of bonus points.
-
Prize Draws Tab:
- View prizes won by the panelist.
-
Tell-a-Friend Campaigns Tab:
- View campaigns participated in and successful recruitments.
Changing Bonus Points Manually
-
Open Detail View:
- Select the desired panelist and click on Edit incentives.
-
Adjust Bonus Points:
- Click on the Change bonus points button.
- Enter the number of points to add or subtract in the “Number of points” field (use format “number.number” for floating points).
- Set the action to “Add” or “Subtract” in the “To member account” field.
- Enter an explanatory text in the “Reason” field (visible to the panelist on the account balance page).
- Confirm by clicking on Submit.
Note: Write rights for panelbonus are required to manually change a panelist's bonus points.
Documenting Contacts
EFS Panel helps document communication with panelists. Clicking the Edit contacts button opens a dialog with three tabs:
- Contacts: Log personal and telephone contacts or e-mail exchanges not conducted via EFS Panel. Use the Add contact button to enter new events.
- Contacts via panel site: Logs requests made via the contact form on the panel site.
- Contacts via system: Logs e-mails sent to panelists via EFS Panel.
Note: To avoid performance issues, mail archives are cleaned automatically every six months.
Logging Contacts Outside EFS Panel:
- Open the detail view for the desired panelist.
- Click Edit contacts.
- Click Add contact to open the form for new events.
- Select the contact method (phone, personal, e-mail) from the “Way of contact” drop-down list.
- The editor and date are set automatically.
- Enter a subject and detailed information in the “Content” entry form.
- Click Submit to save the new entry.
Viewing a Panelist’s Login Data
Access Login Information:
- Click the Show login information button to view the panelist’s pseudonym, panelist code, login link, and security question/answer (if available).
Login Links:
- Panelists can log in using a URL containing a specific code, useful for email invitations. Clicking the login link allows direct access to the panelist’s personal area.
View and Use Login Links:
- Detail view: Find the panelist code in the “Panelist code” field. It is clickable for direct login.
- Show login information: This dialog shows both the panelist code and the login link, which is clickable for direct login.
Generating New Panelist Codes:
- Click Generate new panelist code in the “Status information” section of the detail view.
Exporting Login Links:
- Search for panelists in the Panelists administration and apply “Export links” to export their login links.
Sending Login Links by E-mail:
- Use wildcards to construct personalized login links:
- Wildcard for panelist code:
#panelist_code# - URL parameter:
login_code - Example link:
http://your-domain.com/panelwebsite/?login_code=#panelist_code# - Alternative example:
#panel_url#?login_code=#panelist_code#
- Wildcard for panelist code:
Directing Panelists to Specific Pages:
- Use:
#panel_url#dateiname.php?login_code=#panelist_code#&chosen_site=#site_id#
Using Shortened Login Links:
- If long login links are problematic, generate shorter links using the wildcard
#panelist_login_code#.- Wildcard for shortened code:
#panelist_login_code# - URL parameter for direct login with shortened code:
lc - Example link:
http://your-domain.com/panelwebesite/?lc=QAplygBpxAoPhVL3ceoIL8ztW5g
- Wildcard for shortened code:
Resetting 2FA
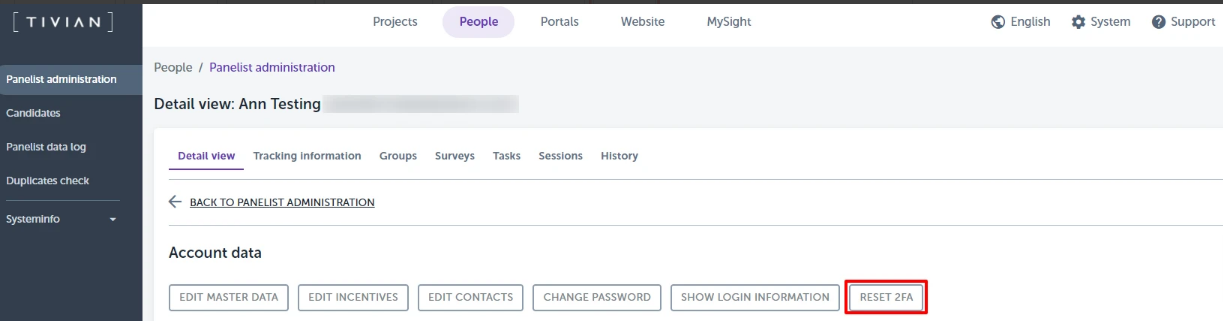
If a panelist has fully set up two-factor authentication for a panel website, the Reset 2FA button is displayed in the panelist administration for this panelist. By clicking this button, you can reset the two-factor authentication for the panelist in question so that they have to scan the QR code again the next time they log in.
Viewing and Changing Member Information
The tabs Groups, Surveys, and Tasks show the panelist's assigned groups, project-specific samples, and tasks.
Note: Memberships in the samples of archived projects are not displayed.
Assigning Panelists to a Sample:
- Use the Assign panelist to a sample feature to manually assign the panelist to a sample and specify their disposition code for the project.
Important Information:
- A panelist can participate in only one sample per project. If a panelist is already allocated to a sample and you assign them to another sample in the same project via the detail view, they will be removed from the first sample.
Viewing Session Data
The Sessions tab provides details of the panelist’s activity on the panel site.
Panel site information
|
Field
|
Meaning
|
|---|---|
| Number of panel sessions |
Total of all previous panel sessions conducted by the panelist. Calculated from the number of successful logins. |
| Number of page views |
Total of all page views triggered by the panelist during panel sessions to date. |
| Date of last login | Indicates when the panelist last logged in to the panel successfully. |
Latest panel sessions
List of latest panel session contains a maximum of 500 sessions.
|
Field
|
Meaning
|
|---|---|
| Start of session | Date and time of login attempt. |
| Last access | Date and time of last registered action in course of the session concerned. |
| Page views (logged in) | Number of page views triggered while the panelist was logged in. |
| Page views (logged out) |
Number of page views triggered after logout, but which can still be referenced to the panelist via session data. |
| Referrer on start | Address from which the panelist reached login |
| IP address on start |
From the panelist's IP address conclusions can be drawn regarding identity, place of residence, country or Internet connection. This can be helpful, for example, if there is any suspicion of dual accounts being maintained or other forms of abuse. Please note: The determination of hostnames and IP addresses is possible only to a certain extent, due to legal and technical reasons. |
| Host name |
From the host name conclusions can be drawn regarding the panelist's identity, place of residence, country or Internet connection. Please note: The determination of hostnames and IP addresses is possible only to a certain extent, see above. |
Viewing Change History of Panelist Data
Changes to address or master data, whether made by panelists or moderators, can be logged and viewed for up to 60 days (this period can be adjusted by support).
Accessing Change History:
- Go to the History tab in the detail view.
- The overview table contains:
- First and last name of panelists, E-mail, Date of change
- Changed by: Indicates if the change was made using the re-registration form or a master data survey.
- Changes: Details of the modification.
- Click on the Show details icon to open a popup window with more information.
Important Information:
- The panelist record history feature is not activated by default due to the large data volume it generates. It can be activated upon request if the panel is not too large.
- To activate this function, contact your TIVIAN support.
- Changes will only be logged from the time of activation.
Candidates
The basic version of EFS Panel uses a two-stage entry procedure. In the first stage, potential participants register and are admitted temporarily. They are then invited to complete the master data survey by the panel administrator. The process involves three steps:
-
Review and Validation:
- Validate data and ensure the candidate is a real person with a functional email address.
- Perform plausibility checks and duplicate checks during registration.
- Ensure contact address and other data are complete.
-
Processing:
- Reject temporarily registered panelists or make further inquiries if needed.
-
Invitation to the Master Data Survey:
- Invite candidates to complete the master data survey to transition to fully valid panelists.
Validating Panelists
The administrator’s central task is to validate panelists to ensure they are real individuals with valid email addresses, and to exclude multiple participations. EFS Panel supports quality assurance through:
- Plausibility checks during registration.
- Immediate check for existing email addresses in the system.
- An overview list of newly registered panelists.
- Optional automated duplicates check.
List of Candidates
The People → Panelists administration → Candidates menu provides an overview of candidates with “admitted temporarily” status. The interfaces and functions here are similar to the panelists administration but restricted to candidates with panel status 1.
- Clicking on a name opens the candidate's detail view.
Inviting Candidates to the Master Data Survey
After validating candidates:
- Select the panelist in the Candidates menu.
- Select the “Master data survey” action.
- Confirm by clicking on Submit.
- Finalize the invitation text and send the mail.
Once candidates complete the master data survey, they become “active” members of the panel, available for panel surveys and other activities like promotional campaigns. They will no longer be listed as candidates.
Duplicates Check
FAQ
How often is the duplicates check performed?
The duplicates check is performed automatically at hourly intervals once activated.
Can I import panelists from an Employee project?
Yes, you can import users or participants from Employee projects into the panel. This feature allows you to import Org Processor users and add them to existing or new panel groups.
How can I reset a panelist's two-factor authentication?
If a panelist has set up two-factor authentication, you can reset it by clicking the "Reset 2FA" button in the panelist administration for that specific panelist.
Priyanka Bhotika
Comments